

How To Build A Wooden Garden Walkway

Make this pallet wood garden walkway
If you've ever desired a meandering pathway in your garden somewhere, you will love this easy tutorial!
Since this pallet wood garden walkway is so easy, you can make it in an afternoon with pretty much any scrap wood you may have on hand!
Here's how I created mine…
This post contains some Amazon affiliate links in which I earn a small percentage from qualifying purchases through these links, at no extra cost to you. Thank-you for helping to support my blog!
Make this pallet wood garden walkway
Supplies I used:
.
reclaimed wood with thickness to it
garden rake
small garden trowel
fresh garden topsoil


This little project began in July 2011, HERE .
Creating a pallet wood garden walkway came to mind one day.
The yard was getting a major revamp with the help of my wonderful neighbours. Since some overgrown shrubs were being pulled, and new soil hauled in, I desired a pathway…

…from the driveway to the lawn.
Let's build a pallet wood garden walkway!

Preparing the area
.
1. Decide where you wish your garden pathway to go.
Because I decided to create easy access from the driveway into the front yard, the removal of some overgrown shrubs was first.
2. A nice flower bed edge was cut, then created so it had more curb appeal.

Learn how to edge flowerbeds like a pro from THIS POST.
Video
.
.
Click above to watch the short video on how to edge your flower beds like a pro!


Adding new soil for added cushion
.
3. With the removal of some scrubs, an empty space was created in the flower bed.
4. Some new garden topsoil was added to create a nice cushion for the planks.

5. Collect reclaimed wood, then cut to the appropriate width desired.
These reclaimed wood boards were found in a pile of pallet wood. I think what makes them work so well for this tutorial is the fact that they are on the thicker side.
You could create a similar effect with treated 2x4s cut to size.

Starting the path
.
6. Create a level pathway (lower than your driveway if applicable) for the boards to sit, ensuring once boards are placed, they are level with the attached driveway or sidewalk.
This will help the garden walkway to avoid becoming a tripping hazard.
Positioning the boards
.
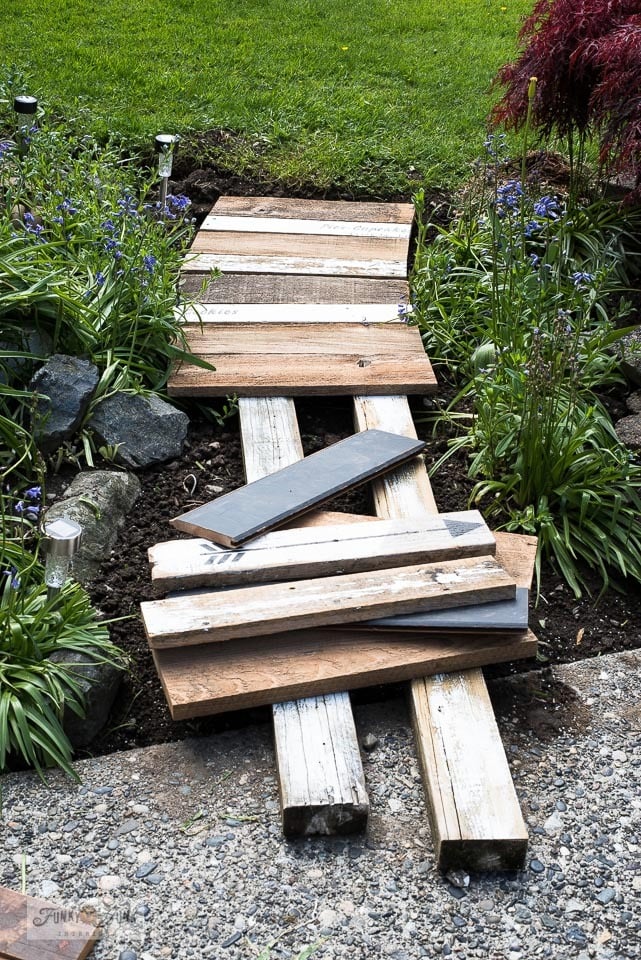
7. Leaving some cushion in the pathway, position each board, then slightly wiggle them into place so they are slightly embedded into the soil to help hold their position.
The extra cushion really helps stabilize the boards.

8. Keep adding boards until you've completed your path.
Consider a slight curve, or stagger the boards, whatever look you wish!
9. Push a little bit of soil in between the boards to help hold them in place.
10. Walk on the boards, to ensure they don't rock.
Add more soil to stabilize if required.
After care
.
11. Leave the boards loose so they can easily be lifted up for weeding.
And they are easy to weed! Lift a couple boards up at a time, weed, then replace!

Adding flower bed accessories
.
Random rocks and rusty junk acting as garden art were then positioned around the walkway, creating a rock garden effect.

Some perennial rock garden plants were added against the rocks so they'd return each year. Aren't those flowers pretty?
From a crowded, overgrown flower bed before…
To this very pretty after! What a difference!
Questions / answers:
.
.
Is the wood treated?
This wood was not treated, however it did end up lasting for 3+ years before is started to show rot. But I don't mind, I can simply replace it when it's time. Treated wood would indeed last longer.
.
What about termites?
Since we don't have a termite issue where I live, I wasn't concerned. However if you do have termites, I'd suggest to keep this garden pathway located away from your home.
.
Is the wood slippery when wet?
Because wet wood can be slippery, you could always add sand to your sealer. I however didn't have any issues since I don't have smaller running kids, or use the pathway when it rains.
.
Do the boards stay in place?
They do! The key was slightly embedding the boards into the soil. It's for this reason I suggest using slightly thicker wood so you can afford to lose some board into the soil.
.
What about gravel down first?
I think that's a good plan if you wish for the boards to last longer. I don't mind the fact that these will rot.
Another thought is to stabilize the boards from underneath and embed those boards instead so the top boards don't rot, much like you were building your own pallet. In fact, I may try that next!
Update: And I did! Check out THIS new walkway!

The little curvy pallet wood garden walkway is PERFECT for getting into the yard now. Such a simple project made such a big impact on the way we use our yard!
And I love that bench we plunked in the front yard. It entices lots of neighbourly conversation and is a really nice spot to sit with a coffee and watch the kiddos play.
I'm so glad I went for this pallet wood garden walkway! Think you'll try one too?!
Update: And check out how the pathway did in year 2 HERE.
,
Other garden projects you may enjoy:
Build this garden-themed walkway on top of treated boards!

Make this FULL pallet walkway… even easier!

Build this pallet wood garden gate!

Assemble this easy 2-pallet chair or loveseat for outdoor living!
Visit many more pallet projects HERE
Read more gardening tips and ideas HERE
Check out more garden junk projects HERE
Other current favs!
How To Build A Wooden Garden Walkway
Source: https://www.funkyjunkinteriors.net/2011/09/my-pallet-garden-walkway.html
Posted by: catheysopupose.blogspot.com
0 Response to "How To Build A Wooden Garden Walkway"
Post a Comment